
Sourdough is all the craze these days! When you need to eat gluten free, it can make you feel you are missing out. But you don’t have to! This gluten free sourdough bread with psyllium husk is the perfect way to be able to jump into the sourdough bread world… even if you have to eat gluten free.
It is true that I have another gluten-free sourdough bread recipe. But that one uses xanthan gum, which can be harder to digest.
You all asked for a gluten free sourdough bread with psyllium husk recipe…. so here it is!
When working with gluten free bread, I typically use psyllium husk because it gels up and does a great job of forming a dough.
However, when it came to sourdough I just couldn’t seem to get it to work quite right.
I don’t like to give up easily, so instead of sticking with my original recipe, I decided to keep experimenting.
Turns out I needed to switch a few ingredients and reduce my water in order to get my dough to form the way it is supposed to.
This gluten free sourdough bread with psyllium husk is so delicious, that my youngest doesn’t want me to make any other bread!
Getting a gluten free sourdough starter going.
The first step in making this bread is you need to make up an active gluten-free sourdough starter recipe.
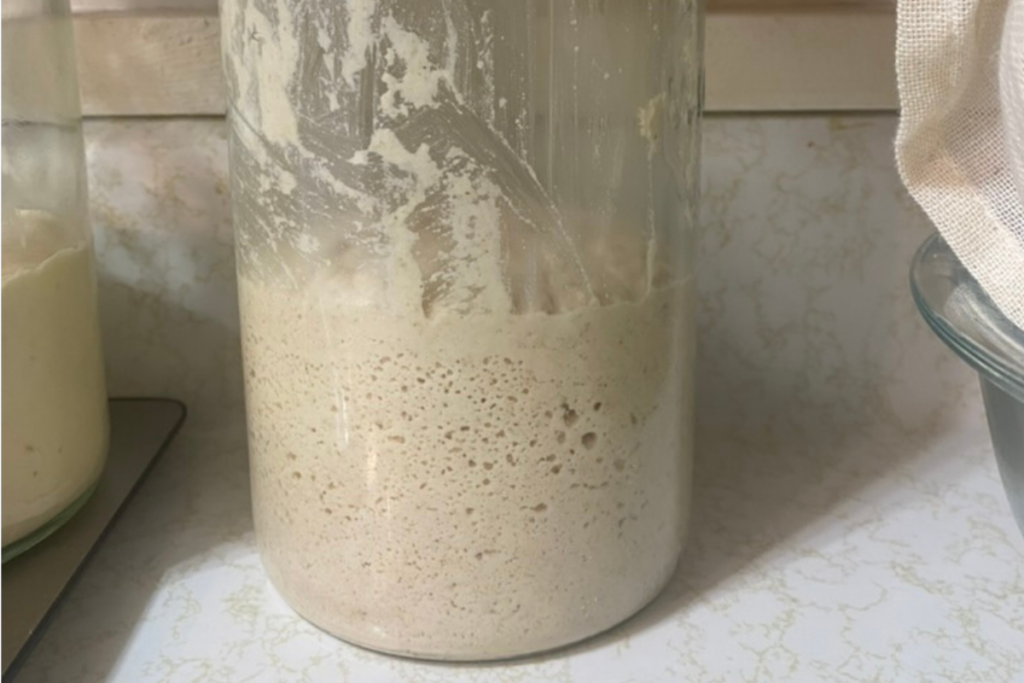
If you don’t already have a sourdough starter going, you will need about 5-7 days to get one started and active before you can make bread.
There are a few things to be prepared for when dealing with a gluten free starter…. your starter will not grow and look the same as a regular sourdough starter.
This was something that shocked me at first and can really throw people off. Your starter will get lots of air pockets and grow a little bit, but don’t expect it to double in size. You will be waiting a long time for that if you do.
Make sure to watch the video below on how I make this gluten free sourdough bread with psyllium husk, where I show what I am talking about with the starter. I give a detailed explanation and show it compared to a regular starter.
What is a sourdough starter?
Your sourdough starter is the wild yeast that makes your bread rise. The great thing about sourdough bread is you are replacing a commercial yeast with this “wild yeast” in a starter.
A starter is made up of flours and water. When mixed together and given time at room temperature to grow, your mix will ferment and become a yeast.
The naturally fermented starter makes your bread products easier to digest for some people.
Can I use an all purpose flour to make this recipe?
In the starter or the bread recipe, I do not recommend using an all purpose gluten-free flour. It doesn’t matter the different brands of flours you try, it just won’t turn out.
The taste and texture of your bread will always be off.
In this recipe I like to use white rice flour and tapioca starch. I buy both in bulk on Azure Standard.
You can replace the white rice flour with any gluten free grain flour. Brown rice flour and sorghum flour are both good options. Just be aware that the grain flour you choose to use will affect the taste of your bread.
Rice flours tend to have a more mild flavor which is why I choose to use them in my bread recipes. I like using white rice flour because it makes the loaf lighter in color and looks the most like a regular sourdough bread.
When should I feed my sourdough starter to be ready to bake?
You want to make sure your sourdough starter is active and ready to use in this recipe. If your starter is not active, it will not give you the rise you are looking for in your bread.
For me the best time to feed my starter is right before bed.
That way, when I wake up in the morning it is alive and active and ready to bake with!
I have gotten into the habit of always feeding my starters at night, instead of the morning, whether I am baking bread or not.
This ensures that I always have the option to bake the next day. It also has become a routine for me, so it is easier to remember and not miss feeding it.
If you ever get tired of feeding your sourdough starter, just place it in the fridge. It will go dormant while it is in there but it won’t die on you. When you are ready to bake bread, take the starter out of the fridge and feed.
It usually takes a couple feedings to wake the starter back up after being in the fridge.
Now that you have your starter alive and active and know when to feed it, let’s get our gluten free sourdough bread with psyllium husk made up!
Ingredients:
- 250g active gluten free sourdough starter
- 320g-340g warm water
- 340g white rice flour
- 230g tapioca starch or tapioca flour
- 20g whole psyllium husk
- 2 TBSP honey
- 2 eggs
- 2 tsp sea salt
- 1 tsp baking powder
- 2 TBSP apple cider vinegar
- 4 TBSP melted butter
How to make gluten free sourdough bread with psyllium husk:
- Using a digital kitchen scale, measure out your starter and water into a clean bowl of a stand mixer. Start with less water, you can always add more water but can’t take away once it’s added. If you don’t have a stand mixer, you can use a large bowl with a hand mixer.
- Add in your whole psyllium husk to your starter and water. Whisk together to mix completely. Let it set to become a psyllium gel.
- Once it has gelled up, add in you flours, honey, eggs, salt, baking powder, apple cider vinegar, and melted butter.
- Mix on medium speed, adding in splashes of water as needed to make your dough come together. Your dough should pull from the sides of the bowl to form a dough ball.
- Your dough will be slightly sticky, but should be easy to work with.
Shaping your dough:
- On a lightly floured surface dump your dough out. Gently roll your dough into the shape you desire. If you prefer a sandwich bread, you will want to place your dough in an appropriate bread pan to rise in.
- Spray a glass medium bowl generously with olive oil or avocado oil. Gently place dough into the well oiled bowl placing your dough seam side up.
- Cover the bowl with a clean tea towel, bowl cover, or plastic wrap. I like to use a shower cap, because they fit perfectly over the bowl and can be used over and over again.
- Let bowl sit in a warm place for 5-8 hours to rise. Proofing times will vary depending on the heat and humidity of your kitchen and could take less time.
Baking your loaf of bread:
- Preheat oven to 425 degrees. Place your dutch oven with lid in the oven while preheating.
- After your dough has rose to your desired height, lay out a piece of parchment paper, and gently dump your dough onto it.
- Score the top of your dough. I am not artistic, so I will usually do one large slash with an X in the middle.
- Carefully lift dough on parchment paper and place into your hot dutch oven. Place 2-3 ice cubes in between the dutch oven and parchment paper and immediately close the lid to make a steaming affect.
- Bake loaf covered with the lid on the dutch oven, for 35 minutes. Uncover the loaf and bake an additional 18 minutes or until the loaf is golden brown. Your internal temperature should be 205 degrees or higher.
- Immediately take loaf out of the dutch oven and place on a cooling rack to cool completely. Do not slice the bread until it is cooled.
- For best results store bread in an air tight container or bag. It is best the first two days.
Prefer to watch it on YouTube:
Gluten Free Sourdough Bread
This gluten free sourdough bread recipe using psyllium husk, makes the best bread for toast, sandwiches, grilled cheese and more!
Ingredients
- 250g active gluten free sourdough starter
- 320g-340g warm water
- 340g white rice flour
- 230g tapioca starch or tapioca flour
- 20g whole psyllium husk
- 2 TBSP honey
- 2 eggs
- 2 tsp sea salt
- 1 tsp baking powder
- 2 TBSP apple cider vinegar
Instructions
- Using a digital kitchen scale, measure out your starter and water into a clean bowl of a stand mixer. Start with less water, you can always add more water but can't take away once it's added. If you don't have a stand mixer, you can use a large bowl with a hand mixer.
- Add in your whole psyllium husk to your starter and water. Whisk together to mix completely. Let it set to become a psyllium gel.
- Once it has gelled up, add in you flours, honey, eggs, salt, baking powder, apple cider vinegar, and melted butter.
- Mix on medium speed, adding in splashes of water as needed to make your dough come together. Your dough should pull from the sides of the bowl to form a dough ball.
- Your dough will be slightly sticky, but should be easy to work with.
- On a lightly floured surface dump your dough out. Gently roll your dough into the shape you desire. If you prefer a sandwich bread, you will want to place your dough in an appropriate bread pan to rise in.
- Spray a glass medium bowl generously with olive oil or avocado oil. Gently place dough into the well oiled bowl placing your dough seam side up.
- Cover the bowl with a clean tea towel, bowl cover, or plastic wrap. I like to use a shower cap, because they fit perfectly over the bowl and can be used over and over again.
- Let bowl sit in a warm place for 5-8 hours to rise. Proofing times will vary depending on the heat and humidity of your kitchen and could take less time.
- Preheat oven to 425 degrees. Place your dutch oven with lid in the oven while preheating.
- After your dough has rose to your desired height, lay out a piece of parchment paper, and gently dump your dough onto it.
- Score the top of your dough. I am not artistic, so I will usually do one large slash with an X in the middle.
- Carefully lift dough on parchment paper and place into your hot dutch oven. Place 2-3 ice cubes in between the dutch oven and parchment paper and immediately close the lid to make a steaming affect.
- Bake loaf covered with the lid on the dutch oven, for 35 minutes. Uncover the loaf and bake an additional 18 minutes or until the loaf is golden brown. Your internal temperature should be 205 degrees or higher.
- Immediately take loaf out of the dutch oven and place on a cooling rack to cool completely. Do not slice the bread until it is cooled.
- For best results store bread in an air tight container or bag. It is best the first two days.
How to make gluten free sourdough bread with psyllium husk:
Shaping your dough:
Baking your loaf of bread:
Need another gluten-free bread recipe?
Gluten Free Sourdough with Xanthan Gum

Leave a Reply